Alfonso Money Manger Tutorials
Introduction to Wallets:
In Alfonso Money Manager, ‘Wallets’ are a powerful feature designed to help you organize and manage your finances more effectively. Think of each wallet as a separate container for transactions related to a specific area of your financial life. Whether it’s your bank account, cash on hand, savings for a vacation, each wallet serves to help you track and control various money flows.
Setting Up Your First Wallet:
- Open the App: Launch Alfonso Money Manager on your device.
- Navigate to Wallets: Find and tap on the ‘Wallets’ section in the main menu.
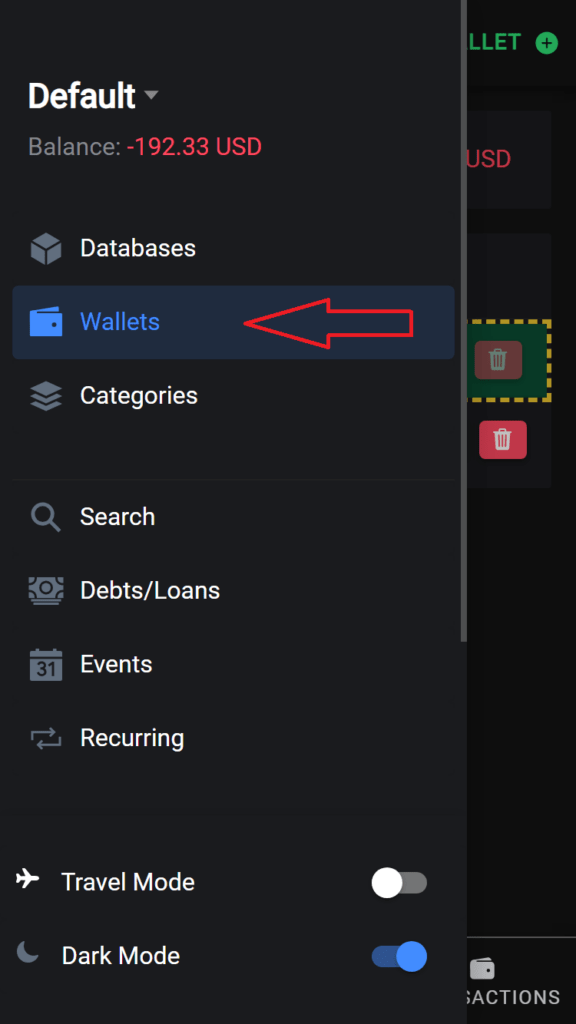
- Create a New Wallet: Select ‘Add New’ or the ‘+’ icon to create a new wallet.
- Customize: Give your wallet a name that represents its purpose, and set specific currency preferences.
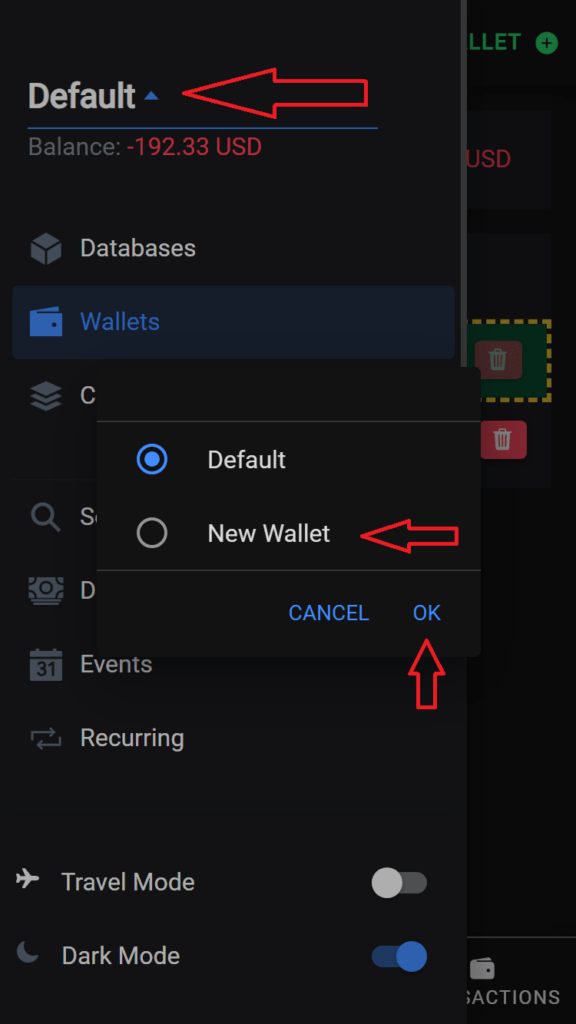
X - Select Wallet: Start adding transactions to your wallet after selecting it
Introduction to Budgeting:
Budgeting in Alfonso Money Manager is a versatile tool designed to give you control over your financial future. By setting budgets for different categories and tracking your progress, you can ensure you’re spending within your means and saving effectively. Alfonso offers two main types of budgeting: Fixed Budget and Available Funds Budget. Let’s dive into how you can utilize these features to manage your money smarter.
Fixed Budget:
What It Is: A Fixed Budget allows you to allocate a maximum amount of money to spend in a specific category over a set period (Daily, Weekly, Monthly). As you add transactions under this category, the progress bar increases, showing you how close you are to reaching your limit.
Setting Up a Fixed Budget:
- Navigate to Budgets: Open the app and go to the ‘Budgets’ section.
- Create New Budget: Tap on ‘Add New Budget’ or the ‘+’ icon.
- Select Type: Choose ‘Fixed Budget’ as the budget type.
- Assign a Category: Select the category you want to budget for.
- Set Amount and Timeframe: Enter the maximum amount you want to allocate and select the timeframe (Daily, Weekly, Monthly).
- Save: Once all details are set, save your new budget.
Monitoring Your Budget:
- View the progress bar in your budget list to see how much of your allocated budget you’ve spent.
- Receive notifications as you approach your limit to avoid overspending.
Available Funds Budget:
What It Is: The Available Funds Budget works by taking your total income (from selected categories) and subtracting your expenses (from selected categories) to show what’s left over. This method is ideal for a more flexible approach to budgeting, where you want to know the disposable income after all planned expenses.
Setting Up an Available Funds Budget:
- Navigate to Budgets: Open the app and go to the ‘Budgets’ section.
- Create New Budget: Tap on ‘Add New Budget’ or the ‘+’ icon.
- Select Type: Choose ‘Available Funds Budget’ as the budget type.
- Select Income Categories: By default, all are selected. You can customize which income categories to include.
- Select Expense Categories: By default, all are selected. Customize which expenses to track.
- Set Timeframe: Choose how often you want this budget to reset (Daily, Weekly, Monthly).
- Save: Save the budget to activate it.
Monitoring Your Budget:
- Check the ‘Available Balance’ to see your disposable income after planned expenses.
- Adjust your spending or income categories as needed for a more accurate reflection of your available funds.
Introduction to Categories:
In Alfonso Money Manager, categories play a crucial role in organizing your financial transactions. They help you differentiate between various types of income and expenses, making it easier to track and manage your money. Each category can be customized with a unique icon and name, providing a clear and visual representation of your financial activities.
Steps to Add a Category:
Select Your Wallet: Open the app and choose the wallet you want to add a category to. Remember, categories are specific to each wallet, allowing for more tailored financial management.
Navigate to Categories: Within the selected wallet, look for the option to manage or view categories. This is usually found in the wallet’s settings or menu.
Add a New Category: Select the option to ‘Add New Category’ or tap on the ‘+’ icon. This will open the category creation interface.
Choose Category Type:
- Income Category: Select this if the category is meant to track incoming funds, like salary, gifts, or other earnings.
- Expense Category: Choose this for tracking outgoings, such as groceries, rent, utilities, or leisure activities.
Name Your Category: Give your category a name that clearly identifies its purpose. For example, ‘Rent’ for housing expenses or ‘Salary’ for your monthly income.
Select an Icon: Choose an icon that represents the category. The right icon can make it visually easier to recognize and track your transactions.
Save the Category: Once you’re satisfied with the settings, save the new category. It will now appear as an option when adding or editing transactions in that wallet.
Tips for Using Categories Effectively:
- Be Specific: Use specific names for your categories to avoid confusion. For example, instead of ‘Bills’, use ‘Electricity Bill’ or ‘Internet Bill’.
- Review and Adjust: Over time, review your categories to see if they still fit your financial situation. Add, edit, or remove categories as needed.
- Consistency is Key: Be consistent in assigning transactions to categories. This consistency is crucial for accurate tracking and analysis of your spending and earning patterns.
Introduction to Multiple Databases:
Alfonso Money Manager offers the flexibility to manage multiple databases, allowing you to segregate your financial data based on different criteria, such as personal versus business expenses or managing separate projects. Each database you create is stored locally in a target directory on your device, ensuring your data is private and secure. Let’s explore how you can effectively utilize this feature.
Why Use Multiple Databases?
- Separate Personal and Business Finances: Keep your personal shopping separate from business expenses and income for clearer financial tracking and easier reporting.
- Manage Different Projects or Goals: Track finances for specific projects, like a home renovation or a vacation fund, without mixing them with your regular expenses.
- Privacy and Control: Different family members or business departments can manage their own finances without access to each other’s data.
Creating a New Database:
Open Database Manager: Launch Alfonso Money Manager and navigate to the database management section in the settings or menu.
Add a New Database: Select the option to ‘Create New Database’ or tap the ‘+’ icon. This will prompt you to define the new database’s details.
Name Your Database: Give your new database a descriptive name that reflects its purpose, like ‘Business 2021’ or ‘Personal Finances’.
Choose Location: Specify the target directory where the database files should be stored on your device. Choose a location that’s secure and easy for you to remember.
Create and Save: Once you’ve set the name and location, create the database. It will be initialized with the necessary files in the specified directory.
Switching Between Databases:
- Select Database: From the database manager, you can see a list of all your databases. Simply select the one you wish to view or edit, and the app will load its data.
- Default Database: Set a default database that automatically loads each time you open the app. This is typically the one you use most frequently.
Examples of Using Multiple Databases:
- Personal vs. Business: Create one database for your personal expenses like groceries, rent, and leisure, and another for business expenses and income.
- Project-Specific Tracking: For a home renovation project, create a separate database to track all related expenses, keeping them distinct from your day-to-day finances.
- Family Budgets: Each family member can have a separate database for their spending, savings, and budgeting, maintaining individual financial autonomy.
Tips for Managing Multiple Databases:
- Regular Backups: Regularly back up each database to prevent data loss. Store backups in a safe and separate location.
- Clear Naming Conventions: Use clear and consistent names for your databases to avoid confusion.
- Privacy Practices: Be mindful of where you store your databases, especially for sensitive or business-related financial data
Introduction to Recurring Transactions:
Recurring transactions in Alfonso Money Manager are a convenient way to automate the tracking of predictable expenses or incomes, such as salaries, bills, or rent. By setting up a recurring transaction once, the app will automatically record it for you based on the specified time period, ensuring you never miss tracking a regular payment or income. Let’s guide you through creating a recurring transaction.
Steps to Add a Recurring Transaction:
Start a New Transaction: Open Alfonso Money Manager and navigate to the section where you typically add a new transaction.
Enter Transaction Details: Fill in the usual details of your transaction, such as amount, category, and any notes.
Enable Recurring Option: Look for an option to make the transaction recurring and enable it. This might be a toggle or a checkbox.
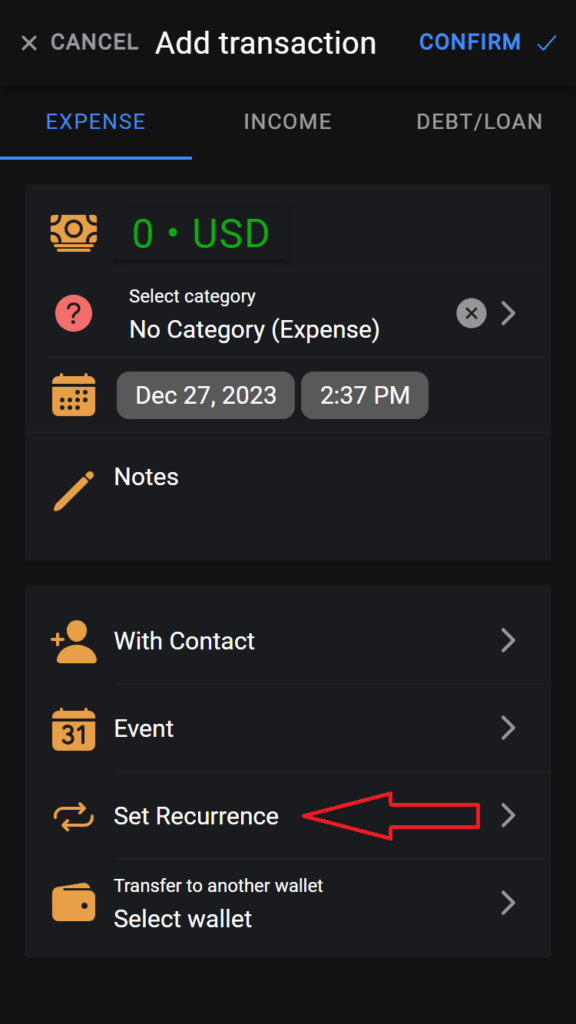
Set Start Date:
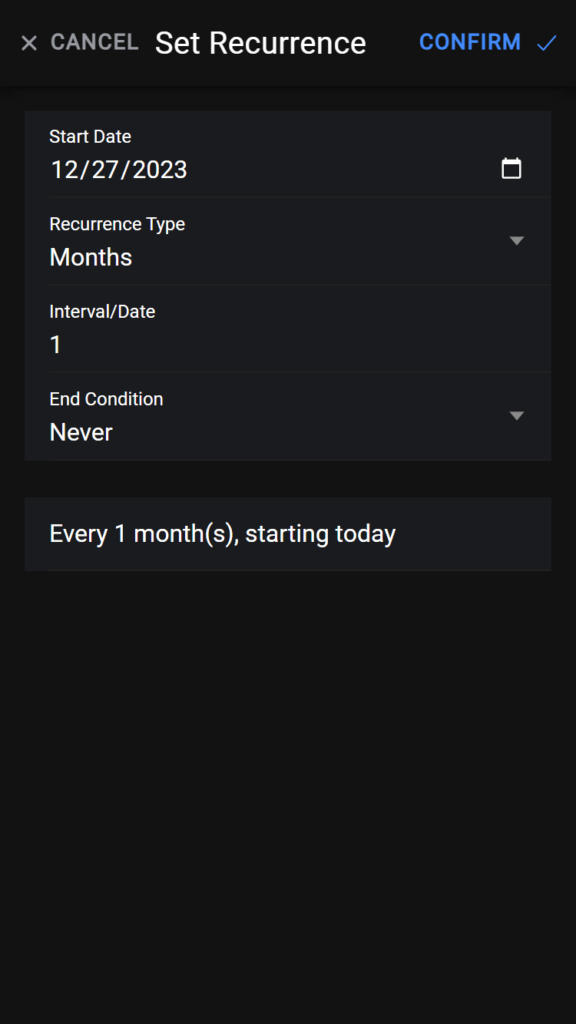
- Start Date: Specify the ‘Start Date’ for when this recurrence should become active. The transaction will start repeating from this date forward.
Choose Recurrence Type:
- Days: If you want the transaction to repeat after a certain number of days.
- Weeks: To have it recur on a specific day of the week, every few weeks.
- Months: For a monthly recurrence, perhaps for rent or salary.
- Date of Month: If you want it to occur on a specific date each month, like the 15th for a monthly bill.
Specify Interval/Date:
- Interval for Days/Weeks/Months: Enter how often the recurrence should happen — every 2 days, 3 weeks, or 4 months, for example.
- Specific Date: If you’ve chosen ‘Date of Month,’ select the specific day.
Define End Condition:
- Never: The transaction will continue to recur indefinitely.
- After a Number of Occurrences: Specify how many times the transaction should occur before stopping.
- On a Specific Date: Choose a date when the recurrence should end.
Review and Save: Double-check all the details and save the recurring transaction. It will now automatically be recorded according to the schedule you’ve set.
Examples of Using Recurring Transactions:
- Salary: Set up a recurring income transaction for your monthly salary.
- Rent or Mortgage: Create a recurring expense transaction that reflects your rent or mortgage due every month.
- Utility Bills: Automate the tracking of regular utility payments like electricity, water, or internet.
- Subscriptions: Track monthly subscriptions or membership fees without manual input each time.
Tips for Managing Recurring Transactions:
- Set Reminders: Even with automation, it’s wise to set reminders a few days before significant recurring payments.
- Review Regularly: Periodically review your recurring transactions to ensure they’re still accurate and necessary.
- Update as Needed: Don’t forget to update recurring transactions if the amount, date, or any other detail changes.
Introduction to Debt/Loans Feature:
Alfonso Money Manager offers a comprehensive way to manage debts and loans, ensuring you always know what you owe and who owes you. When adding transactions, you can categorize them under Debt/Loan, with specific types for various scenarios. This feature helps you keep a clear record of all borrowed and lent money, along with repayments, in one place.
How to Add a Debt/Loan Transaction:
Start a New Transaction: Open the app and initiate the process to add a new transaction.
Select Transaction Type:
- Choose ‘Debt/Loan’ as the type of transaction you’re recording.
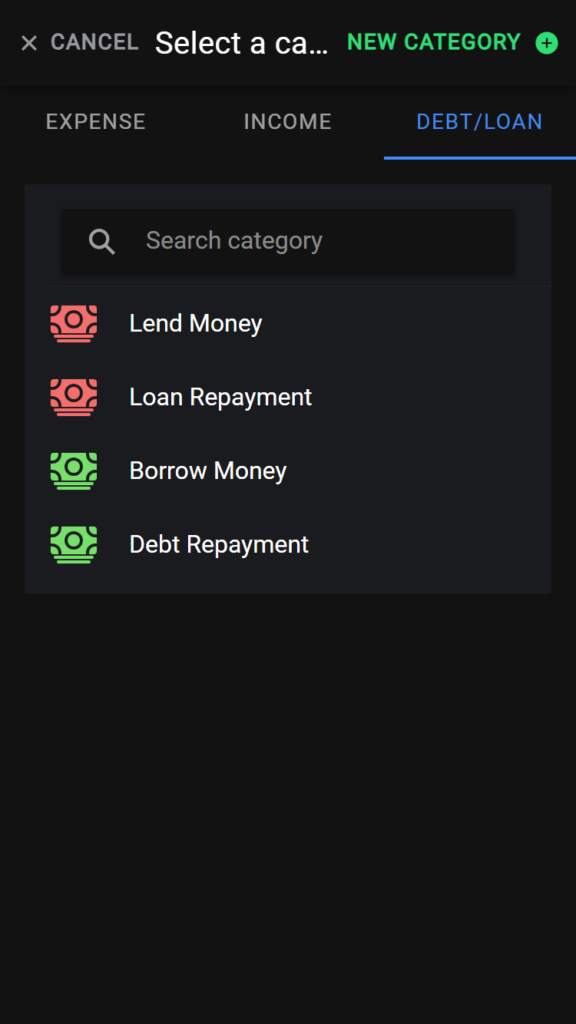
- Choose ‘Debt/Loan’ as the type of transaction you’re recording.
Choose the Appropriate Category:
- Borrow Money: Select this when you receive money that you’ll need to repay later. It’s recorded as income, and the amount you owe is tracked.
- Lend Money: Choose this when you give money to someone else. It’s recorded as an expense, and the amount they owe you is tracked.
- Loan Repayment: Use this when you’re receiving money back from a loan you gave out. It decreases the amount owed to you.
- Debt Repayment: Select this when you’re paying back money you owe. It decreases the amount you owe.
Specify Lender/Borrower:
- Add the name of the person or entity you’re lending to or borrowing from. You can select from your contacts or manually enter a name. If no name is provided, the debt/loan will be unnamed.
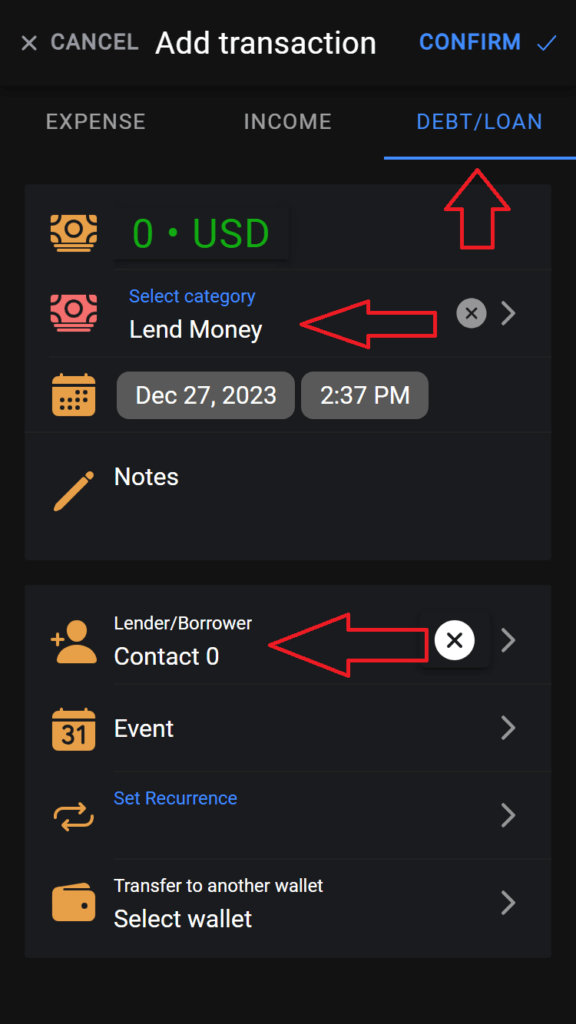
- Add the name of the person or entity you’re lending to or borrowing from. You can select from your contacts or manually enter a name. If no name is provided, the debt/loan will be unnamed.
Enter Transaction Details: Fill in the amount, date, and any notes related to the transaction.
Save the Transaction: Once all details are correct, save the transaction. It will now be reflected in the appropriate debt/loan account.
Tracking and Managing Debt/Loans:
Navigate to Debt/Loan Section: Access this section from the main menu to view all your debts and loans.
Overview of Balances: See at a glance who owes you money (lent out) and to whom you owe money (borrowed).
Add Transactions Directly: From here, you can directly add new borrowings, lendings, or repayments, linking them to the appropriate parties.
Settle Accounts: When a loan is fully repaid or a debt is settled, you can mark it as closed to keep your records up-to-date.
Examples of Using Debt/Loan Feature:
- Personal Loans: Keep track of money borrowed from or lent to friends and family, along with any repayments.
- Business Loans: Manage transactions related to business borrowings or money lent through your business.
- Mortgages or Large Purchases: Track payments and outstanding balances for significant loans like mortgages or car financing.
Tips for Effective Debt/Loan Management:
- Regular Reviews: Periodically review all debts and loans to ensure everything is recorded correctly and up-to-date.
- Clear Communication: Always confirm details with the other party involved to avoid misunderstandings.
Introduction to Events:
Events in Alfonso Money Manager allow you to group related transactions together under a single umbrella, providing a focused view of your spending or income associated with specific occasions or projects. Whether it’s tracking expenses for a vacation or monitoring the budget for a personal project, the Events feature helps you stay organized and aware of your financial activities related to these particular happenings.
How to Create and Manage an Event:
Navigate to the Events Interface:
- Open Alfonso Money Manager and find the ‘Events’ section from the main menu. This is where you’ll see all your active and finished events and where you can create new ones.
Add a New Event:
- Tap on ‘Create New Event’ or the ‘+’ icon to start setting up a new event.
Customize Your Event:
- Name: Give your event a descriptive name that clearly identifies its purpose, like ‘Summer Vacation’ or ‘Home Renovation’.
- Icon: Choose an icon that represents your event. This visual cue will help you quickly identify the event when managing transactions.
- End Date (Optional): Set an end date if the event is time-bound. This helps in tracking and reminds you as the date approaches.
Save Your Event:
- Once you’re satisfied with the details, save the event. It will now appear in your list of events, ready for you to associate transactions with it.
Adding Transactions to an Event:
Start a New Transaction: Begin adding a transaction as you normally would, entering details like the amount, category, and date.
Associate with an Event:
- Before saving the transaction, look for an option to associate it with an event.
- Select the relevant event from your list to link the transaction to it.
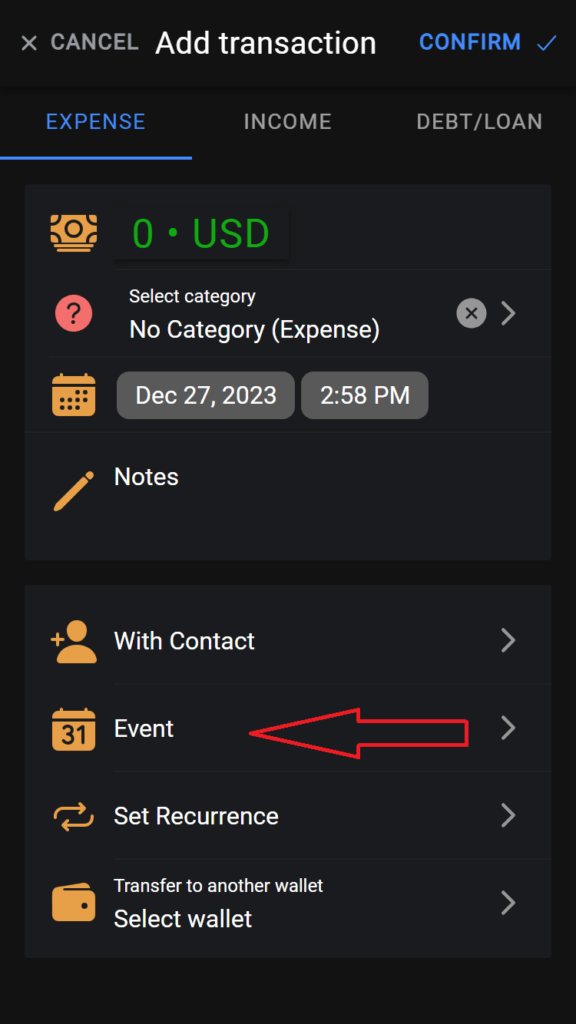
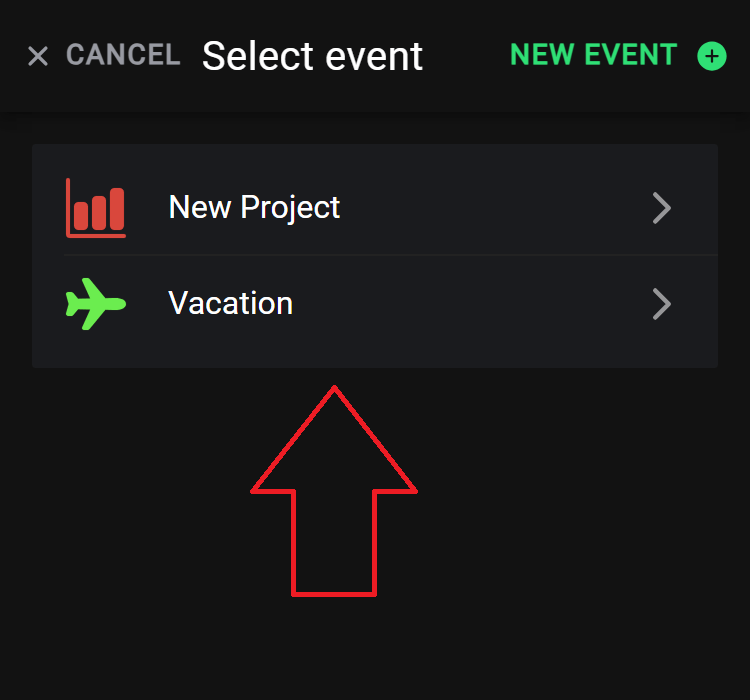
Save the Transaction: With the event linked, save the transaction. It will now be grouped under the chosen event, contributing to its total financial activity.
Viewing and Managing Events:
Access the Events Section: Go to the ‘Events’ section to see a list of all your events.
Select an Event: Tap on an event to view more details, including all associated transactions, total spent, and how it aligns with the end date if set.
Edit or Conclude an Event: If an event is over or details need to change, you can edit its name, icon, or end date. Mark an event as finished when it’s concluded to move it to your list of completed events.
Examples of Using the Events Feature:
- Vacations: Track all expenses related to a trip, from accommodation and flights to dining and activities.
- Projects: Monitor spending on specific projects like home renovations, ensuring you stay within budget.
- Special Occasions: Manage costs for events like weddings, birthdays, or anniversaries to avoid overspending.
Introduction to Travel Mode:
Travel Mode in Alfonso Money Manager is a feature specifically designed to simplify the way you track expenses while on the go, such as during vacations or business trips. When activated, it sets a selected event (like your current trip) as the default for all new transactions, ensuring that every expense is automatically categorized under this event without the need for manual selection each time.
Activating Travel Mode:
Select Your Event:
- Before activating Travel Mode, ensure you have already created an event for your travel or vacation under the ‘Events’ section.
Navigate to Travel Mode:
- Open the app and go to the main menu. Look for the ‘Travel Mode’ option, typically indicated by a distinct icon or label.
Activate Travel Mode:
- Tap on the ‘Travel Mode’ toggle button. It will prompt you to select the event you wish to associate with Travel Mode.
Choose Your Travel Event:
- From the list of events, select the one that corresponds to your current or upcoming travel.
Confirm and Enable:
- Once you’ve selected the event, confirm your choice. Travel Mode is now active, and the chosen event is set as the default for all new transactions.
Using Travel Mode:
Add Transactions as Usual:
- Continue adding transactions the way you normally would. The difference is that now, the travel event you selected will automatically be applied to each new transaction.
Viewing Travel Expenses:
- To see all your travel-related expenses, visit the ‘Events’ section and select your travel event. All transactions added during Travel Mode will be neatly grouped here.
Deactivating Travel Mode:
- Once your trip is over or if you wish to stop using Travel Mode, simply go back to the toggle button and turn it off. New transactions will no longer default to the travel event.
Tips for Using Travel Mode Effectively:
- Preparation: Before your trip, set up a specific event for your travel, including a budget if desired. This makes it easier to track and manage your spending while away.
- Regular Checks: Even in Travel Mode, regularly review your transactions to ensure everything is categorized correctly and you’re staying on budget.
- Post-Trip Review: After deactivating Travel Mode, go through your travel event to review total spending and learn from your financial habits for future trips.
Quick Links
Copyright © 2024. All rights reserved.

